nginx load balancer config example
in my case nginx is in front of two servers (2 copy cats with the same files /php and configurations)
now nginx handles all the images and compression and sends all php and other requests to the other servers
so it can have an very basic config (no advanced modules enabled)
vi /etc/nginx/sites-enabled/balancer
http://gist.github.com/89628
Showing posts with label nginx. Show all posts
Showing posts with label nginx. Show all posts
Thursday, April 02, 2009

Sunday, February 22, 2009
Adding compression to javascript files , css for an A grade in performance
Here is the example for nginx but it can be done the same for an apache configuration
gzip_min_length 1000;
gzip_types text/html text/plain text/css text/javascript application/x-javascript text/xml;
gzip module usually is on but it must be configured as above
one smart thing to do is to precompress your javascript files and css ones
Thursday, February 19, 2009
nginx seems to be popular at wordpress
here is why : it's an very fast load balancer and is easy to use
practical guide to using nginx loadbalancer - Step 1

What is next ? Step one is to test nginx as an proxy for apache and to be an accelerator for static content
In this guide i will show you how to use nginx as an load balancer for php sites running on apache
You can see the old article where i describe the basic idea
I suppose nginx+apache are already installed and working
apache by default is on port 80 nginx on my machine is on port 8087 (by default is on 80 but i moved to 8087)

What is next ? Step one is to test nginx as an proxy for apache and to be an accelerator for static content
apache is to slow on that area , and nginx/lighty are small and blazing fast
replace any 80 port in apache with 8000
grep -r 80 /etc/apache2
and wherever you see 80 in port.conf or virtual host please replace with 8000
hen i have created the proxy config
sudo vi /etc/nginx/sites-enabled/proxy
server {
listen: 80;
server_name: foobar.example.com;
location / {
proxy_pass http://foobar.example.comt:8000;
}
}
restart both apache and nginx
and you should load the local websites and test if they are ok
Next we will add an rule so that all images / javascript /css will not be proxied but served by nginx
erver {
listen 80;
server_name www.foobar.example.comt;
# serve static files
location ~ ^/(img|images|javascript|js|css|flash|media|static)/ {
root /var/www;
# expires 30d;
}
location / {
proxy_pass http://www.foobar.example.com:8000;
proxy_set_header Host $host;
proxy_set_header X-Real-IP $remote_addr;
proxy_set_header X-Forwarded-For $proxy_add_x_forwarded_for;
}
}
So now we have fast serving for images and php is served by one apache
Next we will add more apache servers and do some tests
Wednesday, December 10, 2008

Thursday, September 18, 2008
To fully appreciate Nginx, the web server, it helps to understand Batman, the comic book character.
Batman is fast. Nginx is fast. Batman fights crime. Ngine fights wasted CPU cycles and memory leaks. Batman performs well under pressure. Nginx, for its part, excels under heavy server loads.
But Batman would be almost nothing without the Batman utility belt.
Start to learn Batman utilities
http://emiller.info/nginx-modules-guide.html
Wednesday, August 27, 2008
Experimental fastcgi process manager code tests
To configure Nginx to load balance multiple FastCgi servers use this type of configuration
And the last line said something about php-fpm - it's first time i heard about it
If you’re using spawn-fcgi from lighttpd consider replacing it with php-fpm.
[ED: i will do it soon and got a new acronym derived from the LEMP stack
FLEPS stack (Firebird ,Linux, EngineX,PHP,SSH/SSL)]
Benchmark on a 256mb xen vps:
apache2+mod_php+xcache = 42 req/sec
nginx+xcache+php-fpm = 150 req/sec
NginX and PHP will be compiled from Source as these are softwares with a very fast development, and pre-compiled packages are often prehistoric and are not suitable to apply custom patches (like php-Fpm).
http://www.yawn.it/2008/04/30/nginx-php-php-fpm-on-debian-etch-40/
To configure Nginx to load balance multiple FastCgi servers use this type of configuration
And the last line said something about php-fpm - it's first time i heard about it
If you’re using spawn-fcgi from lighttpd consider replacing it with php-fpm.
[ED: i will do it soon and got a new acronym derived from the LEMP stack
FLEPS stack (Firebird ,Linux, EngineX,PHP,SSH/SSL)]
Tuesday, August 26, 2008
Cakephp Blog tutorial for Ubuntu Firebird and Nginx part 2
If all previous configuration was done then from now on it should be quite simple to
work with original tutorial
so we will follow it from 10.1.6 to the end 10.1.14
The Model class is the bread and butter of CakePHP applications. By creating a CakePHP model that will interact with our database, we'll have the foundation in place needed to do our view, add, edit, and delete operations later.
CakePHP's model class files go in
Naming convention is very important in CakePHP. By naming our model Post, CakePHP can automatically infer that this model will be used in the PostsController, and will be tied to a database table called
For more on models, such as table prefixes, callbacks, and validation, check out the Models chapter of the Manual.
Next, we'll create a controller for our posts. The controller is where all the business logic for post interaction will happen. In a nutshell, it's the place where you play with the models and get post-related work done. We'll place this new controller in a file called
vim app/controllers/posts_controller.php
If you test now the /posts controller you will see that no action is defined for index
http://localhost/posts/

Now, lets add an action to our controller. Actions often represent a single function or interface in an application. For example, when users request www.example.com/posts/index (which is also the same as www.example.com/posts/), they might expect to see a listing of posts. The code for that action would look something like this:
Let me explain the action a bit. By defining function index() in our PostsController, users can now access the logic there by requesting www.example.com/posts/index. Similarly, if we were to define a function called foobar(), users would be able to access that at www.example.com/posts/foobar.
The single instruction in the action uses
To learn more about Cake's controllers, check out Chapter "Developing with CakePHP" section: "Controllers".
If you try to load it you will see the missing view error
http://localhost/posts/

So we have to create the view
Now that we have our data flowing to our model, and our application logic and flow defined by our controller, let's create a view for the index action we created above.
Cake views are just presentation-flavored fragments that fit inside an application's layout. For most applications they're HTML mixed with PHP, but they may end up as XML, CSV, or even binary data.
Layouts are presentation code that is wrapped around a view, and can be defined and switched between, but for now, let's just use the default.
Remember in the last section how we assigned the 'posts' variable to the view using the
$ mkdir app/views/posts
$ vim app/views/posts/index.ctp
Array ( [0] => Array ( [Post] => Array ( [id] => 1 [title] => Foo bazz bar [body] => test blog [created] => 2008-08-22 15:33:17 [modified] => 2008-08-22 15:33:17 ) ) [1] => Array ( [Post] => Array ( [id] => 2 [title] => bazz bar Foo [body] => test blog2 [created] => 2008-08-22 15:33:17 [modified] => 2008-08-22 15:33:17 ) ) )

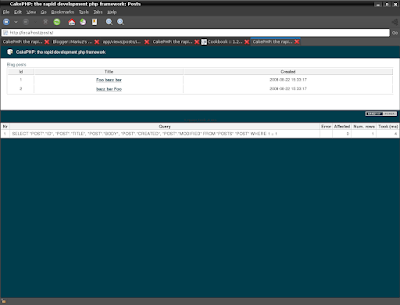
Cake's view files are stored in /app/views inside a folder named after the controller they correspond to (we'll have to create a folder named 'posts' in this case). To format this post data in a nice table, our view code might look something like this:
Hopefully this should look somewhat simple.
You might have noticed the use of an object called
When specifying URL's in Cake, you simply give a path relative to the base of the application, and Cake fills in the rest. As such, your URL's will typically take the form of
At this point, you should be able to point your browser to http://www.example.com/posts/index. You should see your view, correctly formatted with the title and table listing of the posts.
If you happened to have clicked on one of the links we created in this view (that link a post's title to a URL

If you were not so informed, either something has gone wrong, or you actually did define it already, in which case you are very sneaky. Otherwise, we'll create it in the PostsController now:
The set() call should look familiar. Notice we're using read() rather than find('all') because we only really want a single post's information.
Notice that our view action takes a parameter: the ID of the post we'd like to see. This parameter is handed to the action through the requested URL. If a user requests /posts/view/3, then the value '3' is passed as $id.
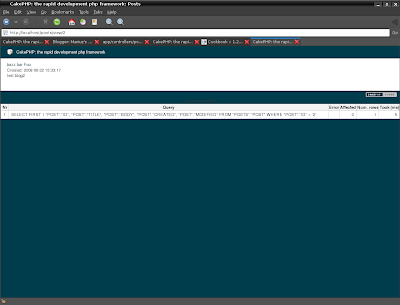
Now let's create the view for our new 'view' action and place it in /app/views/posts/view.ctp.
Verify that this is working by trying the links at /posts/index or manually requesting a post by accessing /posts/view/1.
Reading from the database and showing us the posts is a great start, but lets allow for the adding of new posts.
First, start by creating an
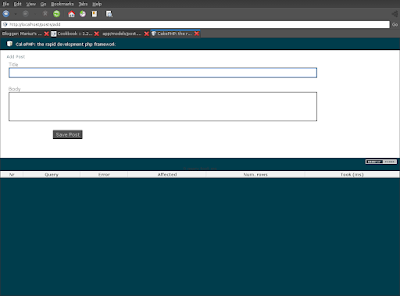
Here's what the
When a user uses a form to POST data to your application, that information is available in
The
Cake goes a long way in taking the monotony out of form input validation. Everyone hates coding up endless forms and their validation routines. CakePHP makes it easier and faster.
To take advantage of the validation features, you'll need to use Cake's FormHelper in your views. The FormHelper is available by default to all views at
Here's our add view:
Here, we use the FormHelper to generate the opening tag for an HTML form. Here's the HTML that
The
The
Now let's go back and update our
, add the following line:
http://github.com/mariuz/firetube/commit/136a4015517c45db34b89b4376520d759f0df759
You may be wondering: how do I tell CakePHP about my validation requirements? Validation rules are defined in the model. Let's look back at our Post model and make a few adjustments:
$ vim app/models/post.php
The
Now that you have your validation rules in place, use the app to try to add a post with an empty title or body to see how it works. Since we've used the input() method of the FormHelper to create our form elements, our validation error messages will be shown automatically.
This logic deletes the post specified by $id, and uses
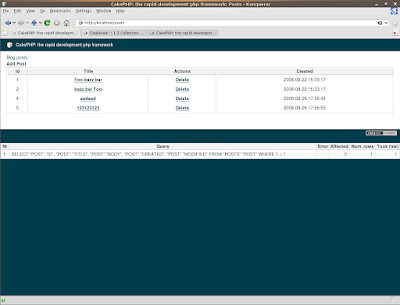
Because we're just executing some logic and redirecting, this action has no view. You might want to update your index view with links that allow users to delete posts, however:

work with original tutorial
so we will follow it from 10.1.6 to the end 10.1.14
Create a Post Model
The Model class is the bread and butter of CakePHP applications. By creating a CakePHP model that will interact with our database, we'll have the foundation in place needed to do our view, add, edit, and delete operations later.
CakePHP's model class files go in
/app/models, and the file we'll be creating will be saved to /app/models/post.php. The completed file should look like this:Naming convention is very important in CakePHP. By naming our model Post, CakePHP can automatically infer that this model will be used in the PostsController, and will be tied to a database table called
posts.For more on models, such as table prefixes, callbacks, and validation, check out the Models chapter of the Manual.
Create a Posts Controller
Next, we'll create a controller for our posts. The controller is where all the business logic for post interaction will happen. In a nutshell, it's the place where you play with the models and get post-related work done. We'll place this new controller in a file called
posts_controller.php inside the /app/controllers directory. Here's what the basic controller should look like:vim app/controllers/posts_controller.php
If you test now the /posts controller you will see that no action is defined for index
http://localhost/posts/

Now, lets add an action to our controller. Actions often represent a single function or interface in an application. For example, when users request www.example.com/posts/index (which is also the same as www.example.com/posts/), they might expect to see a listing of posts. The code for that action would look something like this:
Let me explain the action a bit. By defining function index() in our PostsController, users can now access the logic there by requesting www.example.com/posts/index. Similarly, if we were to define a function called foobar(), users would be able to access that at www.example.com/posts/foobar.
The single instruction in the action uses
set() to pass data from the controller to the view (which we'll create next). The line sets the view variable called 'posts' equal to the return value of the find('all') method of the Post model. Our Post model is automatically available at $this->Post because we've followed Cake's naming conventions.To learn more about Cake's controllers, check out Chapter "Developing with CakePHP" section: "Controllers".
If you try to load it you will see the missing view error
http://localhost/posts/

So we have to create the view
Now that we have our data flowing to our model, and our application logic and flow defined by our controller, let's create a view for the index action we created above.
Cake views are just presentation-flavored fragments that fit inside an application's layout. For most applications they're HTML mixed with PHP, but they may end up as XML, CSV, or even binary data.
Layouts are presentation code that is wrapped around a view, and can be defined and switched between, but for now, let's just use the default.
Remember in the last section how we assigned the 'posts' variable to the view using the
set() method? That would hand down data to the view that would look something like this:$ mkdir app/views/posts
$ vim app/views/posts/index.ctp
Array ( [0] => Array ( [Post] => Array ( [id] => 1 [title] => Foo bazz bar [body] => test blog [created] => 2008-08-22 15:33:17 [modified] => 2008-08-22 15:33:17 ) ) [1] => Array ( [Post] => Array ( [id] => 2 [title] => bazz bar Foo [body] => test blog2 [created] => 2008-08-22 15:33:17 [modified] => 2008-08-22 15:33:17 ) ) )

Cake's view files are stored in /app/views inside a folder named after the controller they correspond to (we'll have to create a folder named 'posts' in this case). To format this post data in a nice table, our view code might look something like this:
Hopefully this should look somewhat simple.

You might have noticed the use of an object called
$html. This is an instance of the CakePHP HtmlHelper class. CakePHP comes with a set of view helpers that make things like linking, form output, JavaScript and Ajax a snap. You can learn more about how to use them in Chapter "Built-in Helpers", but what's important to note here is that the link() method will generate an HTML link with the given title (the first parameter) and URL (the second parameter).When specifying URL's in Cake, you simply give a path relative to the base of the application, and Cake fills in the rest. As such, your URL's will typically take the form of
/controller/action/param1/param2.At this point, you should be able to point your browser to http://www.example.com/posts/index. You should see your view, correctly formatted with the title and table listing of the posts.
If you happened to have clicked on one of the links we created in this view (that link a post's title to a URL
/posts/view/some_id), you were probably informed by CakePHP that the action hasn't yet been defined.
If you were not so informed, either something has gone wrong, or you actually did define it already, in which case you are very sneaky. Otherwise, we'll create it in the PostsController now:
The set() call should look familiar. Notice we're using read() rather than find('all') because we only really want a single post's information.
Notice that our view action takes a parameter: the ID of the post we'd like to see. This parameter is handed to the action through the requested URL. If a user requests /posts/view/3, then the value '3' is passed as $id.
Now let's create the view for our new 'view' action and place it in /app/views/posts/view.ctp.
Verify that this is working by trying the links at /posts/index or manually requesting a post by accessing /posts/view/1.

Adding Posts
Reading from the database and showing us the posts is a great start, but lets allow for the adding of new posts.
First, start by creating an
add() action in the PostsController:Here's what the
add() action does: if the submitted form data isn't empty, try to save the data using the Post model. If for some reason it doesn't save, just render the view. This gives us a chance to show the user validation errors or other warnings.When a user uses a form to POST data to your application, that information is available in
$this->data. You can use the pr() to print it out if you want to see what it looks like.The
$this->flash() function called is a controller method that flashes a message to the user for a second (using the flash layout) then forwards the user on to another URL (/posts, in this case).
If DEBUG is set to 0,
Calling the $this->flash() will redirect automatically. If DEBUG is greater than 0 (DEBUG is 2 by default) flash messages do not redirect.save() method will check for validation errors and abort the save if any occur. We'll discuss how those errors are handled in the following sections.Data Validation
Cake goes a long way in taking the monotony out of form input validation. Everyone hates coding up endless forms and their validation routines. CakePHP makes it easier and faster.
To take advantage of the validation features, you'll need to use Cake's FormHelper in your views. The FormHelper is available by default to all views at
$form.Here's our add view:
vim app/views/posts/add.ctpHere, we use the FormHelper to generate the opening tag for an HTML form. Here's the HTML that
$form->create() generates:< id="PostAddForm" method="post" action="/posts/add">If
create() is called with no parameters supplied, it assumes you are building a form that submits to the current controller's add() action, via POST.The
$form->input() method is used to create form elements of the same name. The first parameter tells CakePHP which field they correspond to, and the second parameter allows you to specify a wide array of options — in this case, the number of rows for the textarea. There's a bit of introspection and automagic here: input() will output different form elements based on the model field specified.The
$form->end() call generates a submit button and ends the form. If a string is supplied as the first parameter to end(), the FormHelper outputs a submit button named accordingly along with the closing form tag. Again, refer to Chapter "Built-in Helpers" for more on helpers.Now let's go back and update our
/app/views/posts/index.ctp view to include a new "Add Post" link. Before the , add the following line:
http://github.com/mariuz/firetube/commit/136a4015517c45db34b89b4376520d759f0df759
You may be wondering: how do I tell CakePHP about my validation requirements? Validation rules are defined in the model. Let's look back at our Post model and make a few adjustments:
$ vim app/models/post.php
The
$validate array tells CakePHP how to validate your data when the save() method is called. Here, I've specified that both the body and title fields must not be empty. CakePHP's validation engine is strong, with a number of pre-built rules (credit card numbers, email addresses, etc.) and flexibility for custom validation rules. For more information on that setup, check the Data Validation chapter.Now that you have your validation rules in place, use the app to try to add a post with an empty title or body to see how it works. Since we've used the input() method of the FormHelper to create our form elements, our validation error messages will be shown automatically.

Deleting Posts
Next, let's make a way for users to delete posts. Start with adelete() action in the PostsController:function delete($id) {
$this->Post->del($id);
$this->flash('The post with id: '.$id.' has been deleted.', '/posts');
}
This logic deletes the post specified by $id, and uses
flash() to show the user a confirmation message before redirecting them on to /posts.Because we're just executing some logic and redirecting, this action has no view. You might want to update your index view with links that allow users to delete posts, however:


Sunday, July 20, 2008
Load Balancing & QoS with HAProxy
[Ed: and seems that nginx can be used like an proxy and load balancer , what next ? you can get rid of complex lvs ]Did you know that Flickr optimizes all of their pages to render in sub 250ms?
When you're fighting with response times, the worst thing you can possibly do is queue up another request behind an already long running process. Not only does the first request take forever, but everyone else must wait in line for it to finish as well! To mitigate the problem HAProxy goes beyond a simple round-robin scheduler, and implements a very handy feature: intelligent request queuing!
HAProxy Request Queuing
 You can get similar functionality in Nginx directly with the 'Fair Proxy Balancer' plugin (EngineYard is rumored to be running it).
Nginx and Memcached, a 400% boost!
seems another way to speed the request responseshttp://www.igvita.com/2008/02/11/nginx-and-memcached-a-400-boost/
Nginx, by default, comes prepackaged with the Memcached module, which allows us to bypass the Mongrel servers and talk to Memcached directly. Same hardware, and a quick test later: ~3,550 req/s, or almost a 400% improvement! Not bad for a five minute tweak!

Subscribe to:
Posts (Atom)